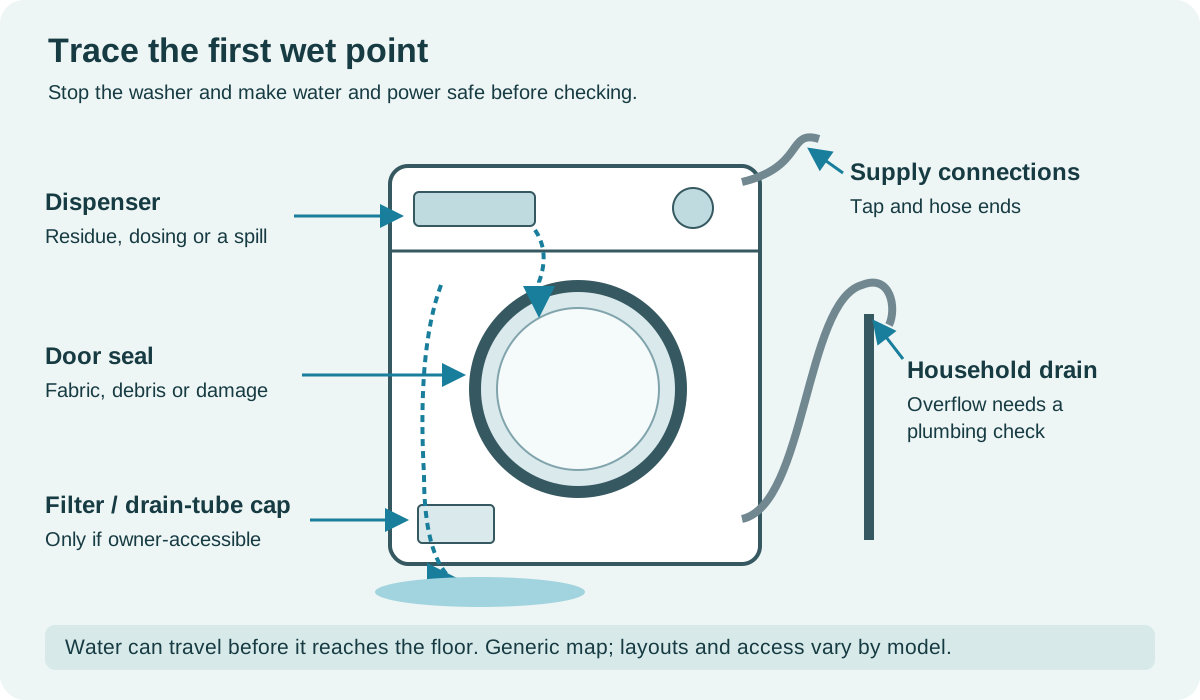
If your washing machine is leaking water, stop the cycle and close the water-supply taps if you can reach them safely. Check where the water first appears: a hose connection, the door, the detergent drawer, a filter cap or the household drain. A puddle underneath does not identify the failed part.
Disconnect power only from a dry, safely accessible position. If water has reached the plug, outlet or controls, keep away and have the electrical supply made safe. Do not pull out a heavy or stacked machine to reach a leak, remove panels, or keep running washes to locate it.
Follow the wet trail upward
Once the washer is safely off, look at the accessible exterior. Water from a drawer can follow the front panel and collect beside the lower filter door. Water at a rear hose can run down the hose before it drips. Note the highest visible wet point, not just the deepest part of the puddle.
Use the timing you already observed. A leak during filling directs attention toward the supply and dispenser; a leak during draining makes the drain outlet worth checking. Those are starting points, not proof that a valve or pump has failed.
| First wet area | What to check with the machine stopped |
|---|---|
| Supply tap or hose connection | Drips at either end, a damaged hose, or a connection disturbed during installation |
| Standpipe or laundry sink | Evidence that discharged water overflowed the household drain |
| Front door | Trapped fabric, hair or residue at the glass and rubber seal |
| Lower service flap, after filter cleaning | Whether the documented filter and small drain-tube closures were correctly refitted |
| Detergent drawer or a trail below it | Residue, correct reassembly, detergent placement and the model-specific branches below |
Water at the supply hoses
Check visible hose connections at the tap and washer. A missing or displaced sealing washer, cross-threaded connection or damaged hose needs correction according to the installation instructions. Shut the supply before disconnecting a hose. Do not keep tightening a connection that will not seal; overtightening can cause damage.
Water overflows the standpipe during draining
If the wet trail begins at the top of the household drain or an overflowing laundry sink, have that plumbing checked. A washer can discharge water successfully while the building drain cannot carry it away.
The drain hose must remain secured in the arrangement specified for the model, with the required air gap. Do not seal an overflowing standpipe with tape or push the hose farther down to hide the spill. If water instead stays inside the washer, use the separate washing machine not draining guide.
Water escapes at the door or lower filter flap
On a front-loader, clean accessible lint, hair and residue from the door glass and gasket as the manual directs. Check for clothing caught across the sealing surface. A torn gasket or continued leakage with the door closed needs service.
If the leak started immediately after filter maintenance, check the filter closure and the small emergency drain-tube plug, where those parts are owner-accessible. Before reopening anything, disconnect power and let hot water cool; follow the manual's draining procedure. Do not force a stiff cap or assume every front-loader has the same accessible filter.
Foam: check the dose and the bleach product
For an HE washer, use HE detergent and the dose appropriate to the product concentration, load and water conditions. The dispenser's maximum-fill mark is not a recommendation to use that much on every load.
Whirlpool front-load branch: if rear leakage is foamy and followed a switch to “no splash” or “easy pour” chlorine bleach, check that product too. Its thickener can create excess suds. This same dosing issue can also affect Whirlpool long-drain complaints; foam is not necessarily caused by the laundry detergent alone.
Detergent drawer leaking: start with the removable parts
With the machine off, remove the drawer only by the method in its manual. Clean the removable inserts and accessible recess, then refit every insert and cover correctly. Close the drawer fully before operation. A clean-looking drawer does not rule out a fault farther inside its housing; persistent leakage is a service issue.
The next checks depend on the dispenser you actually have.
LG WM6700H\*A and WM5700H\*A: manual detergent with ezDispense still on
On these models, adding a manual dose while automatic detergent dispensing remains enabled can produce excess suds. Before using the manual detergent compartment, set Detergent Level to Off through the documented Options menu. The manual also provides a separate Softener Level setting.
Do not change only the automatic dose amount and assume automatic dosing has stopped. Use the controls for your exact model; other LG panels differ.
LG automatic drawer: it leaks as you pull it out to add detergent
On LG dispensers covered by the automatic-drawer leak guidance, a catch limits normal opening. Pulling beyond the intended manual-fill position can spill liquid at the front.
Keep that removal-prevention catch engaged for ordinary filling. If the drawer was removed for cleaning, reassemble it correctly. Do not open it while water is entering. This check concerns how the drawer is being used, not a diagnosis of a cracked internal hose.
LG ezDispense reservoirs: liquid spills during removal or a move
The WM6700H*A / WM5700H*A manual gives a separate handling precaution: move the drawer slowly, supporting it with both hands, because liquid can escape through ventilation holes. Do not remove it while the machine operates. Empty detergent and softener from the reservoirs before moving the washer.
A handling spill calls for correcting that handling; it does not, by itself, establish a leak during washing. Do not plug ventilation holes to prevent a spill.
GE Profile UltraFast Combo: pods and sheets belong in the basket
On the GE Profile UltraFast Combo, place detergent pods, packets or sheets in the wash basket before loading clothes, not in the dispenser drawer. They can obstruct the drawer and cause water to leak from the front.
SmartDispense takes liquid HE detergent. The manual compartment accepts the permitted powder or liquid detergent. Choose the proper location for the product rather than forcing a pod or sheet into a liquid reservoir.
If cleaning did not fix it, report what stayed wet
A Beko WIX845400 owner described cleaning followed by water-pressure adjustments: reducing flow appeared to stop the leak at one point, but detergent clumped and the leak later returned. That account does not justify reducing supply pressure until detergent no longer flushes.
For service, record the full model, first wet point, cycle stage, detergent and bleach products, automatic-dosing setting, and any maintenance immediately before the leak. Distinguish a part already replaced from one merely suggested. Leave internal hose, housing, pump and valve work to the technician.
Only return to the manual's prescribed check after an identified owner-correctable problem has been addressed, closures are secure and the area is safe. Stop if water escapes again. A single dry cycle is not a lasting repair when the original leak was intermittent.